In the process of finding ways to automate my home, I stumbled upon a post on
Make by
Alasdair Allan entitled
Use Raspberry Pi to Measure Broadband Speeds to Hold Your ISP Accountable. This project, as it sounds, will run speed tests with
speedtest.net once an hour, and ultimately log the data to a Google Sheet on your Google Drive.
While following Alasdair's post, I ran into a few issues and felt that I should make a post that explains more of what needs to be completed as far as commands and setup as some are implied but not directly listed. This post uses mostly his post, so please make sure to give him thanks if you like it.
I will be running under the assumption that you already know how to SSH into your Raspberry Pi, but if you don't there is a nice YouTube video
here on how to connect over
PuTTY. I will also be using the assumption that you are logged in as the user
pi, so adjust the user directory as needed if not logged in as
pi.
Here is what will be needed to complete this project:
First things first, lets make sure that the Raspberry Pi is up to date. This can be done one of two ways:
sudo apt-get update
sudo apt-get upgrade
Once you have made sure that your Raspberry Pi is up-to-date, lets get to setting it up for our speedtest tracking. First, we'll make sure that
python-pip and
speedtest-cli:
sudo apt-get install python-pip
sudo pip install speedtest-cli
Now, make sure speedtest-cli works by running it:
speedtest-cli
You should see a result similar to this (I have modfied some information for privacy)
Retrieving speedtest.net configuration...
Retrieving speedtest.net server list...
Testing from Acme ISP (xxx.xxx.xxx.xxx)...
Selecting best server based on latency...
Hosted by Acme Server (Earth) [103.82 km]: 41.753 ms
Testing download speed........................................
Download: 45.68 Mbit/s
Testing upload speed..................................................
Upload: 5.65 Mbit/s
Next, we will get another script to help format the text for easy of transferring it to a spreadsheet. Lets install
speedtest-cli-extras:
git clone https://github.com/HenrikBengtsson/speedtest-cli-extras.git
Now, we will test the new script to see its output:
cd speedtest-cli-extras/bin
./speedtest-csv
Please note that there will be a period of time between when you execute
speedtest-csv and when it provides an output similar to below as it is running the speedtest in the background.
2016-02-22 00:59:52;2016-02-22 01:01:51;Acme ISP;xxx.xxx.xxx.xxx;Acme Server (Earth);103.82 km;43.183 ms;22.98 Mbit/s;2.26 Mbit/s;http://www.speedtest.net/result/xxxxxxxxxx.png
We could stop here now that we have a delimited output, but that leaves a few issues:
- If you want to use the delimited log file, you will need to provide SSH access to the device from outside your local netwrok to check it on the go, OR
- You will need to setup a program to take the delimited file and provide other abilities like graphs
- Neither Alasdair nor I cover that.
So back to it. This next section will get
IFTTT setup to allow our speedtest data to be put into a Google Sheet.
First, connect with the
Google Drive IFTTT channel. Make sure that you allow the Google Drive channel to have access to the account that you want your results to be saved to. Now, follow the
Maker IFTTT channel. With that complete, we will then need to add the Log Speedtest results to Spreadsheet recipe to our account.

Make sure that you set the name the recipe "speedtest" before you click the Add button
Now that the online part is setup, lets finish with the local parts. We will now get an IFTTT version of the speedtest-csv script:
wget https://gist.githubusercontent.com/aallan/bafc70a347f3b9526d30/raw/b9760af4b29fad0335c20a8a24607a52bba0cb6f/speedtest-ifttt.sh
This will place a copy of
speedtest-ifttt.sh in
/home/pi/speedtest-cli-extras/bin.
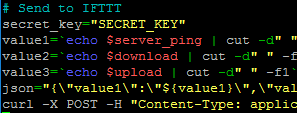
We will need to modify to include your Maker Secret Key, and then make sure that the script can be be executed. Open
speedtest-ifttt.sh in nano:
nano speedtest-ifttt.sh
Scroll to the bottom of the file, and change the SECRET_KEY text to your key from the Maker IFTTT channel page
Once complete, save (Ctrl+O) and exit (Ctrl+X). Now, we will make sure that the script is executable:
sudo chmod +x speedtest-ifttt.sh
Lets test this to make sure that it works:
./speedtest-ifttt.sh
Once complete, you should see the following message:
Congratulations! You've fired the speedtest event
Now check Google Drive, you should have a new Speedtest sheet.
When you open it, you should have a new row with the results:
| February 21, 2016 at 02:16PM | 41.278 | 45.47 | 5.72 |
Now that the are able to get our results saved, lets get a a cron script make and scheduled. For the sake of logging, we will create another script to run
speedtest-ifttt.sh with some extra local outputs. First, create
speedtest-cron.sh:
nano speedtest-cron.sh
Paste the following:
#!/bin/bash
date >> /home/pi/speedtest.log
/home/pi/speedtest-cli-extras/bin/speedtest-ifttt.sh >> /home/pi/speedtest.log
echo "" >> /home/pi/speedtest.log
This will create a quick access log that can be checked locally from first sign on with less speedtest.log, and will append it after each running. Before we test it, lets make sure that the script is executable:
sudo chmod +x speedtest-cron.sh
Ok, now let's test it out:
./speedtest-cron.sh
You should see a new line in your Speedtest Google Sheet, and when you run less speedtest.log, you should see a result like this:
Sun 21 Feb 21:29:16 UTC 2016
Congratulations! You've fired the speedtest event
We will need to schedule this to run at the top of the hour. To do this, we must open and modify the crontab file. To open it, type:
crontab -e
Scroll to the bottom of the file, then paste the following:
# Run Speedtest script "speedtest-cron.sh"
0 * * * * /home/pi/speedtest-cli-extras/bin/speedtest-cron.sh
Now you are set to keep metrics on your Internet connect, so you can make sure you are getting the speeds you pay for. Google Sheets also has some nice features such as conditional formatting and graphs that you can use to get on the fly views of the metrics you capture.